A pop-up error prevented some users from accessing the drive they were using to store their file history when they attempted to choose it. We noticed issues in your File History settings; please re-select your File History driver to change your drive, tap, or click. This article will assist you if you run across We Found Errors in Your File History Settings problem.
Fix We found errors in your file history settings.
Follow the instructions to fix the problem. If you see “Reselect your File History driver,” we identified issues in your File History settings.
Start the File History Service again.
Reconnect the drive after disconnection.
- Use CHKDSK to fix the drive.
- Re-choose your drive.
- Beginning of the File History
- File History Reset
- Let’s go over them in greater detail.
1] Start the File History Service or restart it.
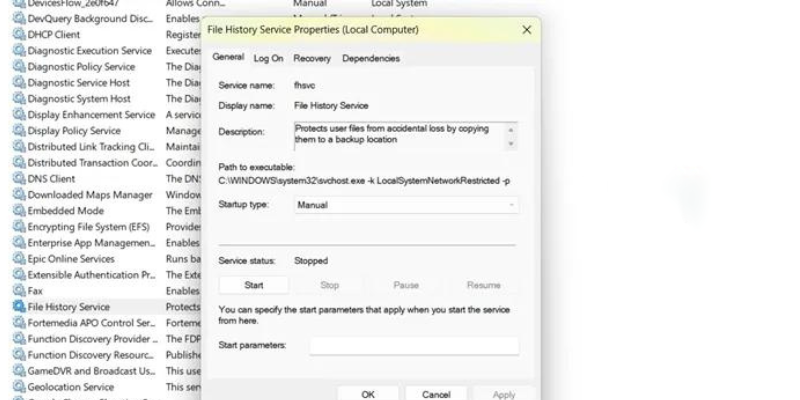

The File History Service needs to be started or restarted as soon as you notice the mistake. There is no chance the backup would function on your machine if the service was stopped. If your problem is the consequence of a glitch, restarting will solve it for you because it will give the service a chance to recover and try doing its job again. Follow the directions to replicate the action.
- From the Start Menu, launch the Services app.
- The File History Service should be located.
- When you right-click, choose Properties.
- If it has been stopped, you must click the Start button to restart it.
- If the service is functioning, click Stop, and then click Restart.
- Hopefully, this time your problem will be solved.
[2] After disconnecting the drive, reconnect it.
One of the things you can do if an external drive is giving you problems is to disconnect and then reconnect the drive. Reconnecting the drive should solve the problem if it’s due to a glitch of some sort.
[3] Use the CHKDSK command to fix the drive.
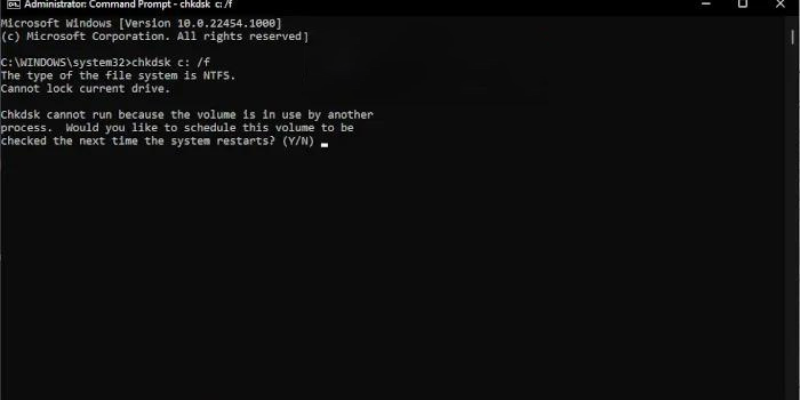

You can also notice the error message if the faulty disc caused it to appear. There are several potential causes for disc corruption, but there is also one tried-and-true fix that you can use to fix the disc. The Check Disk command will be used to accomplish the same thing. Run the following command after opening Command Prompt as an administrator by looking for it in the Start Menu.
chkdsk: /f
Remember to replace with the drive letter you want to repair.
Hit Y to continue when prompted to confirm your activity. Your disc will be repaired after the command has been run, perhaps solving your problem.
4] Choose your drive again.


If the problem notice recurs, you should tap or click on it and then select a device from the right panel by clicking the button on the right panel. After choosing your preferred device, click “Ok.” If you didn’t receive the notification, simply press Win + S, type “File History,” and press Enter to bring up the Select device menu. I’m hoping that this will work for you.
[5] Restart with File History
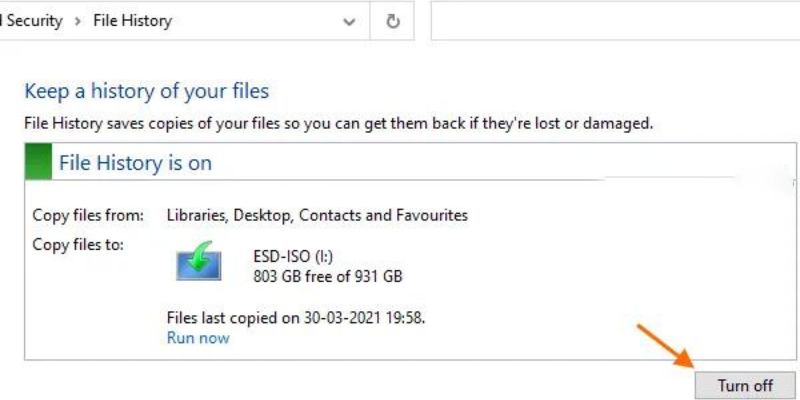

The linked service will be able to restart after we restart File History, which will take care of your problem. You must adhere to the directions to accomplish the same.
- Set up the external device.
- “File History” can be found by searching the Start menu.
- Select “Turn off” from the menu.
- Click the Turn on button right now to restart the service.
I’m hoping that this will work for you.
6] Clear File History


Resetting the file history is your final option if all else fails. We must remove some files to accomplish the same. Remember that you ought to try this if nothing else works. You must first switch off File History to accomplish the same. So, look up “File History” in the Start Menu to see if it has been turned off; if not, click the Turn off button. Open File Explorer and go to the following location after disabling File History:
%UserProfile%\AppData\Local\Microsoft\Windows\
File History
Hit Delete after selecting every folder. Restart file history at this point. It will work for you if you do this.
With the help of the suggestions in this post, we hope you can solve the problem.
If the File History has a problem, it won’t backup the files and will instead display the relevant error as a notification. If so, you can tap on the message to inquire further. This frequently happens because of a bug or corrupted files. If you’ve run into one of these errors, use the post’s solution to fix the problem. Ensure that you begin implementing the first option, and your problem will be quickly fixed.
The Configuration folder houses all the changes you’ve made to File History. You must remove every file from that folder to reset the settings. To get the same result, first disable File History by searching for “File History” in Start and selecting the disabled button. Open Run, navigate to %UserProfile%AppDataLocalMicrosoftWindowsFileHistory/Configuration, press Ctrl + A to select all of the files, and then select Delete from the context menu. You can now activate the file history, and it will return to its default setting.
Last Words
Our guide on how to fix the Windows 11 error “We Found Errors in Your File History Settings” is now complete. The built-in Windows OS function File History states, “We Found Errors in Your File History Settings.” Please pick your file history driver. To change your drive, tap or click. Without further ado, let’s begin our conversation. Some customers encountered an error warning that prohibited them from accessing their file history when they attempted to choose the drive they were using to store it. You can also go to the official Microsoft support website for more information on this problem.